

Clean Edges Of Jpeg In Design Space With Advanced Tools
One of the most common questions I see in the Cricut crafting realm is "how do I get this image cleaning Design Space?". There are a couple ways to "clean up" an image one of which is in Design Space and I am going to walk you through how to do that.
If your newer to Cricut crafting you might not even know that you can do this, I did not when I first started out. I knew you could upload an image to make a design with but had no idea how to make it look even half as good as some I had seen. After I did a bunch of research and watched a ton of YouTube videos I had finally gotten the gust of how to "clean up" an image to get those smooth lines and tiny details.
Cleaning an image in Cricut Design Space on a computer is different than doing it on a mobile device. You will learn how to do both through this article, no need to go searching all over. Let's get learning!
Getting Started
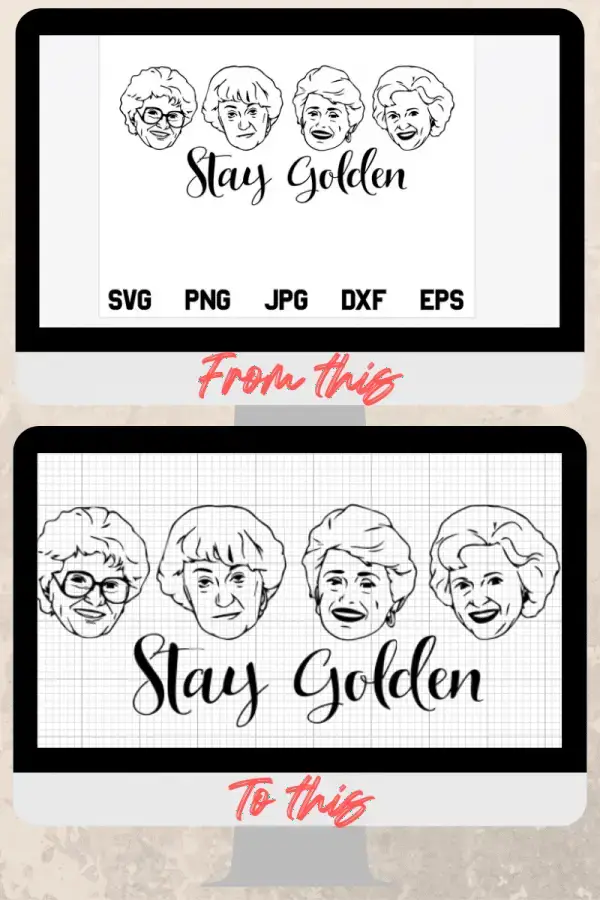
The first thing you will need to do is find an image! To get started you will want a simple image, black and white or just a single color image. Try to stray away from anything more complex for this clean up process. You will want to use the pngtosvg.com trick I use in the tutorial " How to convert any Image to an SVG for Free" for anything more than two colors. That will give you the layers you need to make a successful image transfer. Once you have your image picked your ready to save and upload.
Save your Image
There are a few different ways to save the image. Most crafters right click the image and click "save image as" or something similar. The other frequent save option I chose is to screenshot the image and save it that way, just be warned something this can cause some pixelating or blurriness.
When you save your image put it in a new folder and name that folder something you will remember. If you are super organized then Name the folder "images for designs" then name the different images uniquely as well. That way there is no scrolling through countless images (don't ask please LOL). Once you are saved you can move on to uploading.
Upload
Now you have saved your image and you are ready to upload it into Cricut Design Space. Open up Cricut Design Space and select "new project" then in the left hand corner on the sidebar you will see the option "upload" click on that. From there you will see the following window appear:
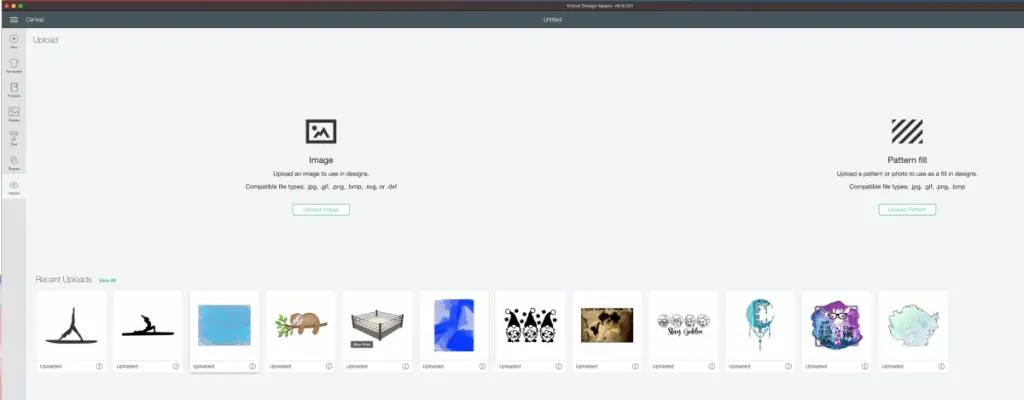
Here you can see all of my uploaded images/designs, you can also see the options of "image" or "pattern fill" for this tutorial ignore the "pattern fill" option. We will cover that in another post. Go ahead and select "upload" when you do that you will see this screen:
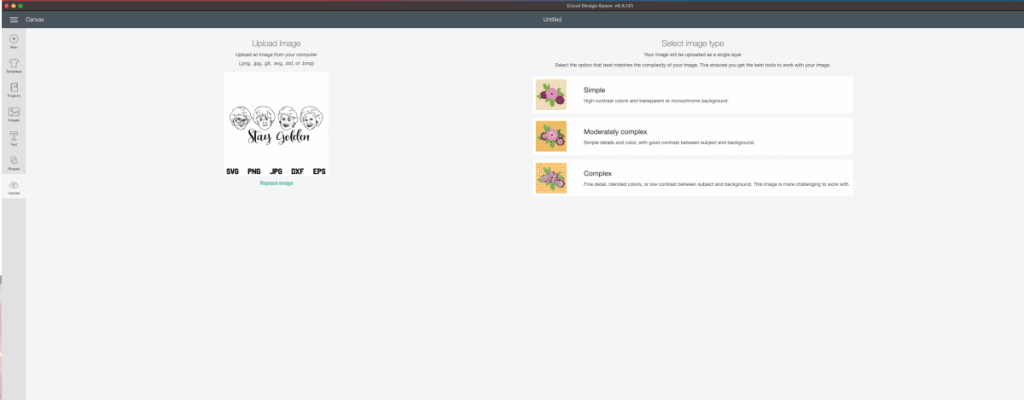
As a general rule of thumb I always select "complex" from the options available here. Even if the image is not complex it cuts the next step down a bit.
Next you will see this screen and this is where you will "clean up" your image.
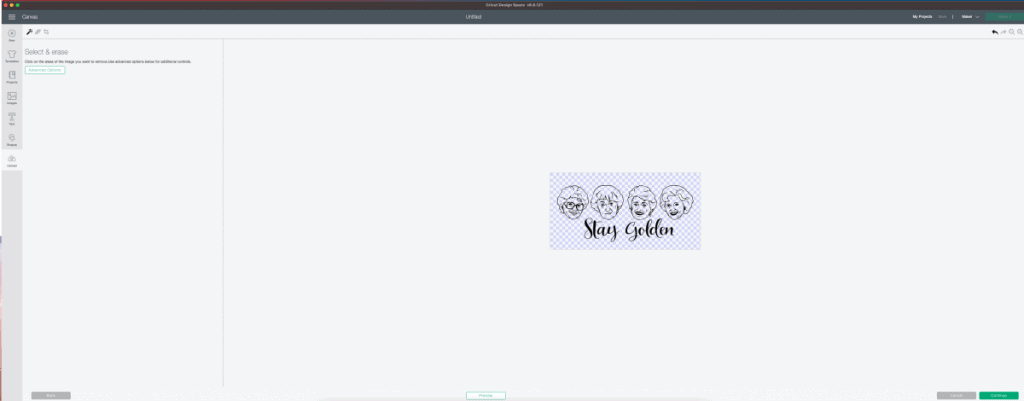
Here you can use the wand which removes pixels of a single color (like if you select the white background of an image the entire area that is white will disappear), the eraser which erases just like a pencil does on paper and crop which allows you to cut parts of the image out.
You also have the option to select "advanced", here you can adjust the filling and smoothness of the lines, you will need to play around with this but most of the time you can set the complexity to 100 and be good with out any spots but sometimes that can also make your image look wonky and still need some more clean up.
Once you have played with the settings and cleaned it up some click on the button at the bottom of the screen that says "preview" this will show you what a silhouette of the image, use this as a reference to see what spots are left or areas that you still need to clear. When you are happy with your image and the clarity of it you will be ready to continue.
Keep in mind the clean up step can be annoying and lengthy, just try to be patient and work through it. As always if you need extra help feel free to reach out by dropping a comment or emailing me.
When ready to continue select "continue" in the bottom right hand corner of your screen.
Save to Cricut Design Space
Next you will save your clean image to Cricut Design Space or their "cloud". This DOES NOT save it to your computer, Cricut does not have a function that will allow you to save your designs to your computer at this step. I am hopeful that they will make this a thing in the future but as of right now you can't.
After you select "continue" from the previous step you will see this screen which gives you two options "save as cut file" or "save as print then cut file". These are two completely different files!
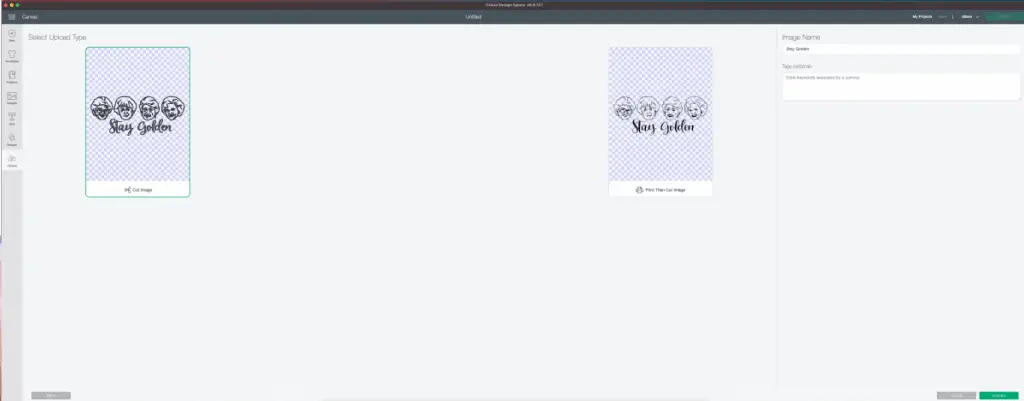
Here are the definitions (or my versions of definitions for "cut file" and "print then cut file":
A "cut file" is an SVG type file that you will cut from vinyl like HTV, permanent, or removable, to place on an object. There can be a single layer or many layers to this image but will all be cut separately.
A "print then cut file" is a file that will have a flat image that will require you to print it first then it will need to be cut using your Cricut machine. I did a tutorial on how to use this feature, in both written and video formats. You can view the written tutorial here and the video tutorial here.
I use both formats very often, the print then cut is handy for stickers, printable HTV and sublimation. Where the cut is great for all vinyl. Depending on what you want to do with the image you can select which format you want.
Please note – If you save it as a print then cut file you can not change it in the process of a project. As in if you decide after you started designing that you wanted to use regular vinyl instead of printing you will need to go back and upload the image, clean it up and save it again as a cut file. However, if you save it as a cut file you CAN switch to print then cut with the simple click from the drop down options in the top tool bar of Cricut Design Space.
Another trick to easily switch a cut file to a print then cut file is to simply select the entire image by clicking on "select all" look over in the right bottom corner and clicking on the flatten tool. This will flatten your image into a print then cut file.
You have now mastered (well maybe not mastered yet) the process of cleaning up an image in Cricut Design Space! Please remember that any images that are not your own are subject to copyright. If you do not take the photo, draw or create the artwork or purchase the image/artwork you CAN NOT SELL anything you create with it. You can gift it or keep it for personal use but not sell it.
Be sure to check out some other nifty functional craft ideas through our other posts here on Craft-ILY as well as checking out some videos on DIY and How To's over on YouTube. Look for "Crafting Unedited" or just click the name in blue to see!
Clean Edges Of Jpeg In Design Space With Advanced Tools
Source: https://craft-ily.com/how-to-clean-an-image-in-design-space
Posted by: cotemecer2002.blogspot.com
0 Response to "Clean Edges Of Jpeg In Design Space With Advanced Tools"
Post a Comment