

How Long To Build A React Native Chat App
Build a native mobile app with React Native
Native mobile app development is a difficult environment. There are different operating systems, a vast array of handset manufacturers and a huge range of screen resolutions to build for. Thankfully, Facebook has released React Native – a framework designed to extend the React approach to mobile application development.
In this tutorial, we're going to build a real-time weather app using OpenWeatherMap's free API. I will cover working with React Native components, imagery and styles, and loading and parsing JSON data.
Getting started
First, download the source files from GitHub. You will find a 'source-imagery' folder that contains the tutorial images, an 'article-steps' folder that contains the source code for each step (plus comments), and a 'completed-project' folder containing the final source project.
You'll need Xcode for compiling the iOS apps (available from the App Store) and the Homebrew OSX package manager. Once you have Homebrew installed, you can open a Terminal window and run the following commands (if you have issues, there a guide here):
- brew install node to install Node.js
- brew install watchman to install Watchman, a file-watching service
- brew install flow, a static data type checker
- npm install -g react-native-cli to install React Native
You can create the project by typing react-native init weatherapp. Make a note of the project folder and open it to see React Native's default folder structure. The iOS directory is where the iOS platform's project files reside. The file we're interested in at this point is 'index.ios.js'. Open this up in your editor of choice.
Let's take a look at the folder structure:
- Lines 8-11 include the React requires for this component of the app
- Lines 15-32 declare the default class for the weatherapp and its render methods
- Lines 34-51 define the styles used in the app
- Line 53 is this Component's export name
The first thing we need to do is to prepare a blank canvas. Change the render method to:
render: function() { return ( <View style={[styles.container, {backgroundColor: this.state.backgroundColor}]}> </View> ); } This creates an empty view using an array of styles - the container style and a state variable called backgroundColor. We will change the backgroundColor variable based on the current temperature when we query the weather API for data. We can also set the container's style to use flex: 1 for centring.
container: { flex: 1 }, Now we're going to use React's getInitialState method. This is invoked automatically on any component when the app is run. We'll use it to declare state variables that are used later. Add this above the render method in the WeatherApp class:
getInitialState: function() { return { weatherData: null, backgroundColor: "#FFFFFF" }; }, Now is a perfect time to jump into Xcode and hit play on the simulator to see your application. One of React Native's fantastic features is its recompile speed. Edit #FFFFFF to another colour and hit 'cmd+R' to see the almost instant reload – pretty neat!
Declaring constants
Let's declare the constants used for the background colours, and another for the openweathermap.org URL that provides the weather data. Add the following just below the React requires:
var BG_HOT = "#fb9f4d"; var BG_WARM = "#fbd84d"; var BG_COLD = "#00abe6"; var REQUEST_URL = "http://api.openweathermap.org/data/2.5/weather?units=metric&"; We'll also need to use another of React's built-in methods, componentDidMount. This is invoked automatically when a component loads successfully. We'll use it to query the navigator to get the current geolocation. Add the following after getInitialState method and before the render method:
componentDidMount: function() { navigator.geolocation.getCurrentPosition( location => { var formattedURL = REQUEST_URL + "lat=" + location.coords.latitude + "&lon=" + location.coords.longitude; console.log(formattedURL); }, error => { console.log(error); }); }, When compiled, the simulator will ask you to allow the application access to your location. You should see the completed URL (the variable formattedURL) displayed in the Xcode output window. React Native uses console.log() to display content like this – very handy for debugging.
The next step is to send our latitude and longitude to the openweathermap.org API. Add the following code below componentDidMount and above render:
fetchData: function(url) { fetch(url) .then((response) => response.json()) .then((responseData) => { var bg; var temp = parseInt(responseData.main.temp); if(temp < 14) { bg = BG_COLD; } else if(temp >= 14 && temp < 25) { bg = BG_WARM; } else if(temp >= 25) { bg = BG_HOT; } this.setState({ weatherData: responseData, backgroundColor: bg }); }) .done(); }, The above code connects to the API to get the JSON response. It then parses the location's temperature and updates the state variable backgroundColor. When the app next renders, it uses this new colour.
Finally, you need to add a line that will call this new fetchData method from the componentDidMount method. The following code goes directly below the console.log we used to display the URL:
this.fetchData(formattedURL); As there may be a delay in loading API data, we need to display a new view that will act as holding text. The following method will return a new view with loading text:
renderLoadingView: function() { return ( <View style={styles.loading}> <Text style={styles.loadingText}> Loading Weather </Text> </View> ); }, As the app renders, it needs to check its state to see if the weather data is available or not:
if (!this.state.weatherData) { return this.renderLoadingView(); } Now, add your own custom loading and loadingText styling into the styles and this section is done.
When you test the app, you should briefly see the loading message and then a background colour that reflects the temperature.
Weather information
It's now time to create the component that displays the weather information. Create a new folder called 'App' in your project root. In this, create another folder called 'Views' , into which we'll copy the WeatherView template from the article steps.
You will notice it is almost identical to the main class. As it already contains placeholder text, we'll jump back to our main index.ios.js class and add a declaration for the component.
var WeatherView = require('./App/Views/WeatherView.js'); Then in the render method, we simply add:
<WeatherView /> 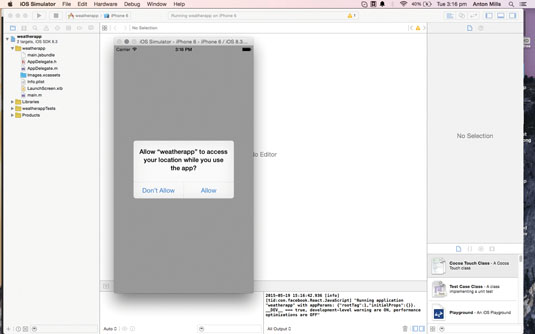
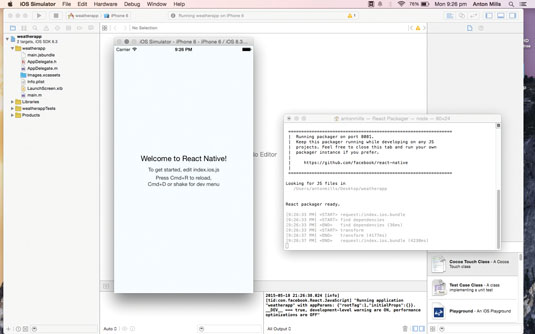
Upon restarting the simulator with 'cmd+R' , you should see 'TEST' displayed in the centre of the screen. You've now loaded your new component.
Adding icons
Now we're going to add icons to our Xcode project for each of the weather types (codes are provided here). In Xcode, open 'Images.xcassets' and drag all of the images from the 'weather_icons' folder.
To save a lot of typing, go into the GitHub repo, and replace your current 'WeatherView.js' with the one in Step 7. The new code you can see is an array, indexed by the weather icon code returned from the API. Before we can use it, we need to pass the weather data into this component.
In order to achieve this, we can use state variables again, and – thanks to propTypes – we can declare the data-type we expect back. Add the following directly under the WeatherView class creation:
propTypes: { weather: React.PropTypes.string, temperature: React.PropTypes.int, city: React.PropTypes.string, country: React.PropTypes.string }, Let's amend the markup returned from WeatherView. The following code adds a weather image, plus text for the temperature and city and country. Notice how the tags reference the props variables and, for the image, the variable for the key of the array, so the correct image shows.
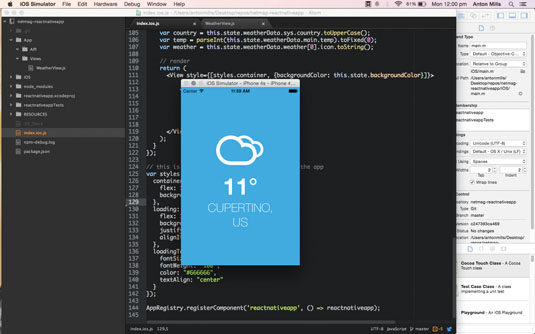
<View style={styles.centreContainer}> <Image source={weatherIconArray[this.props.weather]} style={styles.weatherIcon} /> <Text style={styles.weatherText}>{this.props.temperature}°</Text> <Text style={styles.weatherTextLight}>{this.props.city},</Text> <Text style={styles.weatherTextLight}>{this.props.country}</Text> </View> The styles we need to add for this are:
weatherIcon: { width: 132, height: 132, }, weatherText: { fontSize: 62, fontWeight: "bold", color: "#FFFFFF", textAlign: "center" }, weatherTextLight: { fontSize: 32, fontWeight: "100", color: "#FFFFFF", textAlign: "center" } Here we specify the weather icons' width and height. The weatherText style creates a large, heavy font for the temperature, and weatherTextLight creates a light font for the location fields.
Adding data
All that remains is to add some data. Head to your 'index.ios.js' and update the render method to:
var city = this.state.weatherData.name.toUpperCase(); var country = this.state.weatherData.sys.country.toUpperCase(); var temp = parseInt(this.state.weatherData.main.temp).toFixed(0); var weather = this.state.weatherData.weather[0].icon.toString(); return ( <View style={[styles.container, {backgroundColor: this.state.backgroundColor}]}> <WeatherView weather={weather} temperature={temp} city={city} country={country} /> </View> ); This parses the JSON response and takes the city, country and temperature data, and passes it to the component. Now if you 'cmd+R' to restart the simulator, you should see your final app.
This is the core of building a React Native application. It's that simple! I hope you enjoy working with it.
Words: Anton Mills
Anton Mills is a creative technologist who also specialises in game development. This article was originally published in issue 270 of net magazine.
Liked this? Read these!
- Rapid prototyping in mobile app design
- How to build an app: try these great tutorials
- Free graphic design software available to you right now!
Related articles
How Long To Build A React Native Chat App
Source: https://www.creativebloq.com/web-design/build-native-mobile-app-react-native-121518147
Posted by: cotemecer2002.blogspot.com
0 Response to "How Long To Build A React Native Chat App"
Post a Comment